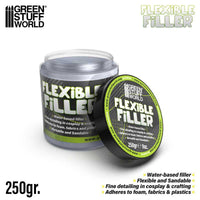
Green Stuff World Flexible Filler – Acrylic Elastic Gap Filler 250ml
🎭 Green Stuff World Flexible Filler
Elastic Acrylic Gap Filler for EVA Foam, Cosplay & Flexible Materials
250ml Tube • Stays Flexible When Dry • Won't Crack or Peel
🛡️ Finally—A Gap Filler That Moves With Your Work
Flexible Filler solves the biggest problem with traditional gap fillers on flexible materials: cracking and peeling when surfaces bend or flex. This specialized acrylic formula dries to a soft, elastic finish that moves with EVA foam, thermoplastics, and other flexible materials without breaking apart. Perfect for cosplay armor, costumes, props, and any project where joints, seams, and surfaces need to flex repeatedly. The 250ml tube with precision applicator makes it easy to fill gaps, smooth seams, and fix imperfections—and it stays waterproof and durable once cured, ready for painting and heavy use.
📋 Technical Specifications
⭐ Why Cosplayers & Prop Makers Love It
Won't crack when armor bends, joints move, or surfaces flex
Once cured, resists moisture for outdoor events and conventions
Accepts all paint types including flexible paints like Plasti Dip
Precision tip allows controlled filling of smallest gaps
Bonds permanently to EVA foam and thermoplastics
Ready to sand and paint in just a few hours
🎯 Perfect Applications
🛡️ Cosplay Armor & Costumes
Essential for EVA foam armor construction:
- Fill seams between foam pieces
- Smooth panel joints and connections
- Hide hot glue lines and edges
- Repair cracks and damage before events
Flexibility prevents cracking when you move, pose, or fight.
⚔️ Props & Weapons
Build seamless prop weapons and accessories:
- Smooth seams on foam swords and shields
- Fill gaps in 3D printed prop parts
- Repair broken or damaged props
- Create smooth transitions between materials
Waterproof finish protects props from convention wear and tear.
🎭 Worbla & Thermoplastics
Perfect for thermoplastic armor work:
- Fill seams in Worbla constructions
- Smooth edges and transitions
- Hide texture differences between materials
- Create seamless multi-material builds
Flexible enough to move with thermoplastic properties.
🎬 Film & Theater Props
Professional-grade prop finishing:
- Stunt-safe flexible weapons and armor
- Durable props for repeated performances
- Weather-resistant outdoor set pieces
- Quick repairs between takes or shows
Professional durability for demanding production schedules.
🏗️ Flexible Model Parts
For models with moving or flexible components:
- Articulated joints and hinges
- Rubber or silicone model parts
- Flexible vehicle or aircraft panels
- Models subject to handling and transport
Won't crack from repeated flexing or manipulation.
🎨 Artistic Installations
Create flexible art pieces and displays:
- Wearable art and sculptural costumes
- Interactive exhibition pieces
- Outdoor weather-resistant installations
- Flexible signage and displays
Waterproof and flexible for long-term durability.
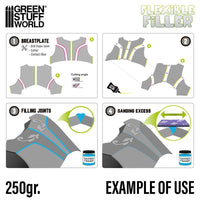
📖 How to Use Flexible Filler
Complete Application Process
🧤 Preparation
Clean surfaces thoroughly to remove dust, oils, or release agents. Flexible Filler needs clean material for best adhesion. For EVA foam, make sure there's no silicone residue from cutting mats or molds. Dry surfaces completely before application.
1. Squeeze & Apply
Cut the tube tip to your desired opening size—smaller for fine work, larger for filling bigger gaps. Squeeze filler directly into seams, gaps, or cracks. Apply generous amounts; it's easier to remove excess than to add more later. For deep gaps, fill in layers rather than one thick application.
2. Smooth & Shape
Use a wet finger, damp sponge, or silicone tool to smooth the filler into place. Water is your friend—keep tools damp to prevent sticking. Work the filler into gaps, feathering edges outward for seamless blending. Remove excess immediately; it's much easier while wet.
3. Initial Drying (1-2 Hours)
Leave your work flat or supported to prevent sagging. The filler will be touch-dry in 1-2 hours depending on thickness and humidity. At this stage, you can carefully handle the piece but avoid flexing or bending the filled areas.
4. Full Cure (4-6 Hours)
Allow 4-6 hours for complete curing. Thicker applications may need overnight drying. Once fully cured, the filler will be soft and flexible to the touch but won't be tacky. Test by gently pressing—it should feel like soft rubber.
5. Light Sanding (Optional)
If needed, lightly sand with fine-grit sandpaper (220-400 grit). The flexible nature means aggressive sanding can roll or peel the material. Use light pressure and smooth, even strokes. For best results, sand before the filler fully cures (after 2-3 hours when it's still slightly firm).
6. Prime & Paint
Apply flexible primer or paint directly to the cured filler. For foam armor, use Plasti Dip, flexible acrylics, or airbrush paints designed for flexible surfaces. Standard acrylics work but may crack with extreme flexing. Multiple thin coats work better than one thick coat.
💡 Pro Tip: For ultra-smooth finishes, do a final pass with a very wet sponge or brush right after application. This creates a glass-smooth surface that needs minimal or no sanding. Work quickly before the filler starts setting.
💡 Pro Techniques for Cosplayers
🔹 Perfect Seam Finishing
For invisible seams on EVA foam armor: Apply a thin bead of Flexible Filler along the seam. Use a damp finger to press and smooth it into the joint, working from one end to the other. Feather the edges outward so they blend seamlessly with the surrounding foam. Let dry, then apply a light coat of contact cement over the entire area before painting—this creates a unified surface texture.
🔹 Hiding Hot Glue Lines
Hot glue creates visible ridges on foam. Apply Flexible Filler over glue lines with a wet spatula or popsicle stick, pressing firmly to fill any gaps. Smooth with a damp sponge in long, even strokes. The flexible filler bonds to both the hot glue and foam, creating a smooth transition that flexes with the armor.
🔹 Building Up Low Spots
For areas where foam is compressed or uneven, build up thin layers of Flexible Filler. Apply first layer, let dry 2-3 hours, then add another layer. Multiple thin layers work better than one thick application. Sand lightly between layers if needed for perfect smoothness.
🔹 Emergency Repairs at Conventions
Keep a small amount of Flexible Filler with you at cons. When armor cracks or seams split, clean the area quickly, apply filler, smooth it, and let it air dry for 30-60 minutes. While not fully cured, it will hold well enough to get you through photo shoots and events. Finish the repair properly later.
🔹 Creating Texture Transitions
When combining smooth and textured sections, use Flexible Filler to create gradual transitions. Apply filler to the edge of the smooth section, then stipple with a damp sponge while wet to create texture that blends into the textured area. This technique works great where Worbla meets foam or where different foam textures join.
🔹 Reinforcing High-Stress Areas
For joints that see a lot of movement (elbows, knees, shoulders), apply a thin layer of Flexible Filler over the entire joint area, not just the seam. This creates a flexible skin that distributes stress and prevents single-point failures. Works especially well on articulated armor sections.
❓ Frequently Asked Questions
Can I use this on regular miniatures or models?
You can, but it's not ideal. Flexible Filler is designed specifically for flexible materials and stays soft when cured. For rigid materials like plastic or resin miniatures, you'll get better results with traditional gap fillers like Green Putty or Magic Sculpt that cure rock-hard and sand more easily.
Will it work on 3D printed parts?
Yes, but best results are on flexible 3D prints (TPU, flexible filaments) or when filling gaps between rigid prints and flexible materials like foam. For rigid-to-rigid joints on PLA or resin prints, traditional fillers give cleaner results since you can sand them smooth more easily.
How do I prevent it from sticking to my tools?
Keep everything wet. Dip your fingers, spatulas, or sponges in water frequently while working. The water-based formula releases cleanly from wet surfaces. If filler does dry on tools, let it cure fully then peel it off—it comes away as a rubbery film.
Can I thin Flexible Filler with water?
Yes, slightly. Add small amounts of water (5-10% by volume) and mix thoroughly if you need a thinner consistency for spreading or coating. Don't over-thin—too much water weakens the bond and increases shrinkage. Use thinned filler immediately as it won't store well diluted.
Will paint make it rigid and defeat the purpose?
Thick paint layers can reduce flexibility. Use flexible paints like Plasti Dip, flexible acrylics, or thin coats of regular acrylics. Avoid thick enamel or lacquer buildup. Most cosplayers seal foam with Plasti Dip or similar flexible sealers before painting, which preserves the flexibility of the Flexible Filler underneath.
How long will it last on a costume?
When properly applied and protected with flexible paint, Flexible Filler holds up for years of convention use. It's waterproof once cured, resistant to sweat and humidity, and won't peel or crack from repeated flexing. Most failures come from inadequate surface prep or using rigid paints over flexible filler.
Can I sand it smooth after it dries?
Light sanding is possible but challenging due to the flexible nature. The filler tends to roll or peel under aggressive sanding. Best practice: smooth it perfectly while wet using water and tools. If you must sand, do it after 2-3 hours when it's leather-hard but not fully flexible yet. Use fine grit (220+) with very light pressure.
What's the shelf life of an opened tube?
When stored properly (cap tightly sealed, stored upright in cool, dry place), Flexible Filler lasts 6-12 months after opening. If it thickens slightly, you can add a few drops of water and mix to restore consistency. If it develops an unusual odor or becomes lumpy, it's time to replace it.
⚖️ Flexible vs Traditional Fillers
📦 Storage & Safety
- Store upright with cap tightly sealed to prevent drying out
- Keep in cool, dry place away from direct sunlight and extreme temperatures
- Clean nozzle after each use with damp cloth to prevent clogging
- Non-toxic and low odor—safe for indoor workshop use
- Wash hands after use—while non-toxic, avoid prolonged skin contact
- Ventilation recommended though minimal fumes produced
- Shelf life: 12 months unopened, 6-12 months after opening
- If tube clogs: Use a pin to clear the nozzle or cut tip to larger opening
📦 Package Contents
1× Green Stuff World Flexible Filler (250ml)
Squeeze tube with precision applicator tip • Water-based acrylic formula • Ready to use immediately
✅ The Bottom Line
If you work with EVA foam, thermoplastics, or any flexible material, Flexible Filler is essential. It solves the fundamental problem of traditional gap fillers—cracking and peeling when surfaces flex. The waterproof, elastic finish means your armor, props, and costumes will look perfect through countless wears, photo shoots, and conventions. The 250ml tube provides plenty of material for multiple projects, and the precision applicator gives you control over every seam and gap. Stop fighting with rigid fillers that crack—switch to the flexible solution that actually works.
One tube handles multiple armor builds—essential for every cosplayer's toolkit.
Our brands


