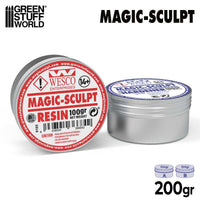
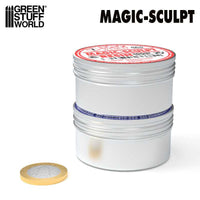
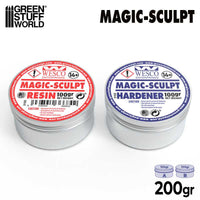
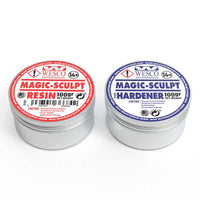
Magic Sculpt – Two-Part Epoxy Modelling & Sculpting Putty 200g
✨ Magic Sculpt Epoxy Putty
Professional Two-Part Epoxy for Precision Sculpting & Modeling
1 Hour Working Time • Ceramic-Smooth Finish • Zero Shrinkage
🎨 The Sculptor's Choice
Magic Sculpt is a premium two-part epoxy putty designed for serious sculpting and modeling work. What sets it apart is the combination of a 1-hour working time with a remarkably smooth, ceramic-like finish after curing. Unlike cheaper putties, Magic Sculpt produces zero shrinkage, won't crack or deform, and cures hard enough to machine, drill, and sand while retaining enough flexibility to resist breaking under stress. Whether you're building detailed character conversions, structural armatures, or intricate scenic elements, this putty delivers professional results every time.
📋 Technical Specifications
⭐ Professional-Grade Advantages
Full hour to sculpt, shape, and refine before it starts setting
Incredibly smooth surface that's ready for fine detail work
Maintains exact dimensions—no warping or collapsing
Strong enough for load-bearing armatures and supports
Drill, tap threads, carve details after it cures
Holds crisp edges and intricate textures perfectly
🎯 Professional Applications
🗿 Character Sculpting
Create highly detailed original miniatures and figures:
- Sculpt entire miniatures from scratch
- Add clothing folds and fabric textures
- Build facial features with fine detail
- Create hair, fur, and organic textures
The 1-hour working time lets you develop complex shapes without rushing.
⚙️ Conversions & Modifications
Transform existing miniatures into unique pieces:
- Replace weapons and equipment
- Repose limbs and adjust poses
- Add armor plates and accessories
- Blend kitbashed parts seamlessly
Strong adhesion bonds new elements permanently to existing models.
🏗️ Structural & Armature Work
Build internal supports and load-bearing elements:
- Create wire armatures for large sculpts
- Build strong joints for multi-part models
- Reinforce thin or fragile sections
- Connect heavy components securely
High strength and flexibility prevent structural failures.
🎨 Terrain & Diorama Building
Construct detailed scenic elements:
- Sculpt rock formations and cliff faces
- Build architectural details (bricks, tiles)
- Create tree bark and wood textures
- Add cobblestone and ground textures
Ceramic finish accepts washes and weathering beautifully.
🔧 Repairs & Restoration
Fix damaged or broken models permanently:
- Repair snapped limbs and weapons
- Fill large chips and missing sections
- Rebuild broken scenic pieces
- Reinforce weak or cracked joints
Bonds stronger than the original material in many cases.
🎭 Master Models & Prototypes
Create originals for molding and casting:
- Sculpt production masters for resin casting
- Develop concept models and prototypes
- Create detailed relief sculptures
- Build display pieces and art projects
Zero shrinkage ensures accurate mold dimensions.
📖 How to Use Magic Sculpt
Complete Sculpting Process
🧤 Preparation
Have your sculpting tools ready: wire tools, silicone shapers, dental picks, and a small container of water or rubbing alcohol. Wear gloves if desired, though Magic Sculpt is relatively skin-safe (wash hands after use). Work on a non-stick surface like glass, plastic, or wax paper.
1. Measure Equal Volumes
Cut or scoop equal amounts of Part A (resin) and Part B (hardener). The ratio is 1:1 by volume, not weight. For most sculpting work, start with a walnut-sized amount—you can always mix more. Color will differ between parts before mixing.
2. Mix Thoroughly
Knead both parts together with your hands or a mixing tool for 2-3 minutes. Continue mixing until you achieve a completely uniform color with no streaks, swirls, or marbling. Incomplete mixing will result in soft spots or tacky areas that won't cure properly. The putty will warm slightly during mixing—this is normal.
3. Shape & Sculpt
Apply the mixed putty to your model or armature. You have approximately 1 hour of working time before it begins to stiffen. Use water or alcohol on your tools to prevent sticking—dip frequently for smooth results. Build up forms gradually, adding bulk first then refining details. The putty remains soft enough to push, pull, and texture for the full working time.
4. Create Textures & Details
For smooth surfaces, use wet tools or fingers to burnish the putty. For textures, use stamps, brushes, toothpicks, or specialized texture tools. Sharp tools can carve crisp lines and patterns. The putty holds fine detail exceptionally well—you can create fabric weaves, scales, rivets, and other intricate patterns.
5. Initial Cure (2-3 Hours)
After about 2 hours, the putty will be firm to the touch but still slightly flexible. At this stage, you can cut, trim, or carve with sharp blades. This is a good time to clean up edges or remove excess material. The putty won't smear or deform but is easier to cut than when fully cured.
6. Full Cure (6-8 Hours)
Leave your work undisturbed for 6-8 hours at room temperature. Warmer environments speed curing; cooler slows it. Once fully cured, the putty will be rock-hard with a smooth, ceramic-like finish. It's now ready for sanding, drilling, carving, or painting.
7. Finishing & Refinement
Sand with progressively finer grits (start at 220-400, finish with 600-1000). The putty sands cleanly without clogging paper. You can drill holes, tap threads, or carve additional details with sharp tools. Prime and paint normally—Magic Sculpt accepts all paint types without special preparation.
🔥 Speed Curing Tip: Apply gentle heat (hair dryer, heat lamp) to accelerate curing. Heat to about 40-50°C can reduce cure time to 3-4 hours. Don't overheat—excessive temperature may cause bubbling or uneven curing.
💡 Professional Sculpting Techniques
🔹 Layered Sculpting Approach
Don't try to sculpt everything in one session. Build a base form, let it cure overnight, then add clothing or armor on top of the solid foundation. This layered approach gives you something firm to work against and prevents accidentally deforming earlier work. Each layer can be as detailed as needed without worrying about disturbing previous layers.
🔹 Armature Integration
For large or dynamic poses, build a wire armature first. Twist aluminum wire into the basic skeleton, then apply Magic Sculpt around it. The putty bonds mechanically to the wire, creating a reinforced structure. For maximum strength, leave the wire ends exposed, drill holes in a base, and insert the sculpture for permanent mounting.
🔹 Blending Fresh to Cured
Magic Sculpt bonds excellently to itself, even after curing. To blend new putty onto cured sections, lightly roughen the cured surface with sandpaper, clean with alcohol, then apply fresh putty. Use wet tools to feather the edges smoothly. The bond will be as strong as the original material once cured.
🔹 Texture Stamping
Press texture stamps, fabric, mesh, or natural materials into soft Magic Sculpt to transfer patterns. For repeatable textures, make a silicone stamp from your first impression and use it on future projects. The putty captures microscopic detail, so even fabric weaves and wood grain transfer perfectly.
🔹 Creating Hollow Forms
For large projects where solid putty would be wasteful, build over a core of aluminum foil, cork, or foam. Apply Magic Sculpt in a shell 3-5mm thick over the core. This saves material, reduces weight, and prevents potential cracking from thick solid sections. The core also provides something to push against while sculpting.
🔹 Tool Lubrication
Keep a small dish of water nearby for traditional sculpting, or use 70% isopropyl alcohol for ultra-smooth finishes. Alcohol evaporates faster than water, leaving less residue. For the smoothest possible surface, final-pass with alcohol-dampened silicone shapers. The putty will polish to a near-gloss finish.
🔹 Subtractive Refinement
After the putty reaches the leather-hard stage (2-3 hours), you can carve crisp details that would be difficult to sculpt while soft. Use a sharp hobby knife, dental tools, or needle files to cut clean lines, sharpen edges, and refine shapes. This hybrid additive/subtractive approach gives you the best of both sculpting and carving.
⚖️ Epoxy Putty Comparison
❓ Frequently Asked Questions
Can I extend the working time beyond 1 hour?
Yes. Store mixed putty in the refrigerator or freezer to slow the reaction. Cold significantly extends working time—refrigeration can double it, freezing can pause it for hours. Warm the putty back to room temperature before continuing to work. Alternatively, work in a cool environment to naturally extend the pot life.
Why does Magic Sculpt feel slightly tacky during curing?
This is normal for the first 2-3 hours as the epoxy undergoes its chemical reaction. The surface may feel slightly sticky even when the bulk is firm. By 6-8 hours, it will be completely non-tacky. If tackiness persists beyond 12 hours, you likely didn't mix the components thoroughly enough.
Can I paint directly on cured Magic Sculpt?
Yes, but priming is recommended for best results. The cured surface is slightly porous and accepts primer excellently. Most modelers use standard spray or brush-on primer before painting. Magic Sculpt accepts acrylics, enamels, oils, and lacquers without any special preparation.
How do I remove Magic Sculpt from tools?
Before it cures, clean tools with soap and water, rubbing alcohol, or acetone. Once cured, you'll need to scrape or sand it off mechanically. Keep tools clean during work by dipping in water/alcohol frequently. If putty hardens on tools, soak in acetone overnight to soften for removal.
Can Magic Sculpt be cast or molded?
Absolutely. Magic Sculpt creates excellent master models for silicone mold-making. The smooth finish and zero shrinkage mean accurate reproductions. You can also press Magic Sculpt into existing molds while soft, though release agent is recommended. It's commonly used for creating production masters.
What's the shelf life of unmixed components?
When stored properly (sealed, room temperature, away from moisture), Magic Sculpt components last 1-2 years. If either part becomes excessively hard or develops an unusual odor, it may have degraded. Store containers tightly closed and consider dividing large quantities into smaller containers to minimize air exposure.
Can I add pigments or fillers to Magic Sculpt?
Yes. Mix in acrylic paint (small amounts), dry pigments, or fillers like talc or wood dust. Keep additions under 10% of total volume to avoid weakening the epoxy bond. Some sculptors add metallic powders for cold-cast metal effects or sawdust for textured bases.
How does it compare to polymer clay?
Magic Sculpt cures at room temperature (no baking needed), won't dry out while you work, and becomes rock-hard when cured. Polymer clay requires oven baking, can harden if left out, and remains slightly flexible after baking. Magic Sculpt is better for structural work and load-bearing applications; polymer clay is better for very fine, delicate details.
📦 Storage & Safety
- Keep components separated until ready to use—cross-contamination causes premature curing
- Store in airtight containers at room temperature (15-25°C)
- Avoid moisture exposure—water can affect the hardener component
- Wear gloves if desired though Magic Sculpt is relatively skin-safe
- Work in ventilated area—epoxies can produce mild fumes during mixing
- Wash hands thoroughly after handling—don't eat or touch face while working
- Shelf life: 1-2 years for unopened components when stored properly
- Disposal: Mix unused putty completely and let cure, then dispose as solid waste
📦 Package Contents
Part A: Epoxy Resin Component
Part B: Epoxy Hardener Component
Two-part epoxy system • Mix ratio 1:1 by volume • Professional modeling compound
✅ The Bottom Line
Magic Sculpt is the professional's choice for a reason. The combination of extended working time, ceramic-smooth finish, and zero shrinkage makes it ideal for serious sculpting work where quality matters. Whether you're creating original character designs, converting existing miniatures, or building detailed terrain pieces, Magic Sculpt delivers the precision and durability you need. It's forgiving enough for beginners learning to sculpt but capable enough for professional master-making and production work.
One session with Magic Sculpt will show you why sculptors prefer it over the alternatives.
Our brands


