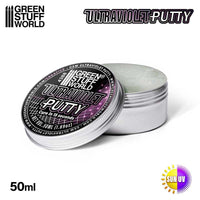
Green Stuff World UV Putty – Ultraviolet Modelling Gap Filler 50ml
💜 Green Stuff World UV Putty
Single-Component UV-Cure Modeling Filler & Surface Smoother
50ml • No Mixing Required • Cures in 15 Seconds Under UV Light
⚡ Work Fast, Cure Instantly
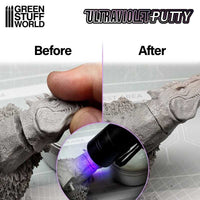
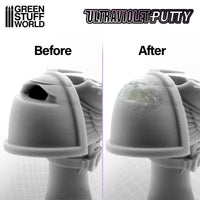
UV Putty revolutionizes the gap-filling process with instant UV-light curing technology. This single-component formula requires no mixing, stays workable indefinitely until exposed to UV light, then hardens completely in just 15 seconds. Apply thin layers with precision, cure each layer instantly, and move directly to sanding and painting—all in a fraction of the time traditional putties require. The semi-transparent finish shows you exactly where you've applied material, eliminating guesswork during finishing work.
📋 Technical Specifications
⭐ Game-Changing Advantages
15 seconds under UV light vs 30-60 minutes for traditional putties
Work at your own pace—putty stays soft until you cure it
Cure thin layers instantly, build up complex shapes gradually
Semi-transparent finish shows exactly where you've filled
Single component means no waste, no measuring, no guessing
Use only what you need—the rest stays fresh in the jar
🎯 Practical Applications
🔧 Seam & Gap Filling
Perfect for closing visible joints on assembled models:
- Miniature assembly seams
- Vehicle kit panel gaps
- Multi-part weapon connections
- Base and scenic piece joins
Apply, shape, cure in seconds—perfect seam removal in under a minute.
🎨 Surface Correction
Fix casting defects and prepare smooth surfaces:
- Fill mold lines and air bubbles
- Smooth rough resin surfaces
- Repair chipped paint or damaged details
- Level uneven base surfaces
Semi-transparent finish lets you see high spots before sanding.
✏️ Detail Building
Add small sculptural elements layer by layer:
- Build up armor plates gradually
- Create raised panel lines
- Add small rivets or bolts
- Sculpt minor clothing folds
Cure each layer instantly, then add more—complete control over shape.
🔨 Conversions & Modifications
Quickly modify miniatures and models:
- Fill unwanted detail (remove logos, symbols)
- Adjust poses by filling/rebuilding joints
- Create custom weapon modifications
- Blend kitbashed parts seamlessly
Test fit, adjust, cure—iterate rapidly on conversion ideas.
🏗️ Terrain & Diorama Work
Speed up scenic construction:
- Fill gaps between foam sections
- Smooth plaster casting imperfections
- Create small water effects (transparent look)
- Repair broken scenic pieces instantly
No waiting for layers to dry—finish terrain projects same day.
⚙️ Scale Model Assembly
Ideal for plastic and resin kits:
- Aircraft canopy frame filling
- Automotive body panel seams
- Ship hull plate gaps
- Armor kit part joins
Sand and prime the same session—no overnight waiting.
📖 How to Use UV Putty
Step-by-Step Process
⚠️ What You'll Need
UV lamp (365-405nm wavelength)—Green Stuff World UV lamps are specifically designed for this product. LED nail-curing lamps also work. Standard daylight or incandescent bulbs will NOT cure UV putty.
1. Prepare the Surface
Clean the area with isopropyl alcohol to remove oils, dust, and mold release agents. Ensure the surface is completely dry. UV putty works best on clean, grease-free surfaces.
2. Apply UV Putty
Use a small spatula, old brush, toothpick, or sculpting tool to scoop out a small amount. Apply directly to gaps, seams, or defects. Work the putty into recesses and undercuts. The semi-transparent nature helps you see where you're applying material. Take your time—the putty won't harden until you expose it to UV light.
3. Shape & Smooth (Optional)
Use tools dipped in isopropyl alcohol to shape and smooth the putty before curing. You have unlimited time to perfect the shape. For very smooth finishes, use a silicone-tipped tool or damp brush to blend edges seamlessly with the surrounding surface.
4. UV Cure
Hold your UV lamp approximately 1cm (about 0.5 inches) from the putty surface. Expose for 15-30 seconds. Thin layers (under 1mm) cure in 15 seconds; thicker applications (up to 2mm) need 30 seconds. The putty will transition from semi-soft to completely hard.
5. Add More Layers if Needed
For deep gaps or complex shapes, apply UV putty in thin layers. Cure each layer fully before adding the next. This prevents incomplete curing of buried material and gives you precise control over the final shape. Build up gradually rather than filling deep gaps in one application.
6. Sand & Finish
Once cured, the putty can be sanded immediately with any grit sandpaper. Start with 400-600 grit for shaping, then move to 800-1000 grit for final smoothing. The material sands cleanly without gumming up paper. You can also drill, carve, or cut cured UV putty with standard modeling tools.
7. Prime & Paint
After sanding, wipe away dust and apply your standard primer. UV putty accepts all paint types—acrylics, enamels, lacquers—without any special preparation. The semi-transparent nature disappears completely under primer and paint.
💡 Pro Tip: Keep your UV lamp off to the side while working, then bring it over when ready to cure. This prevents accidental exposure that could harden putty on your tools. Clean tools immediately with isopropyl alcohol if putty accidentally cures on them.
💡 UV Lamp Requirements
Choosing the Right UV Light Source
| Light Source | Effectiveness | Notes |
|---|---|---|
| Green Stuff World UV Lamp | ⭐⭐⭐⭐⭐ | Specifically designed for hobby use, optimal wavelength |
| LED Nail Curing Lamp | ⭐⭐⭐⭐ | Works well, widely available, affordable |
| UV Flashlight (365-405nm) | ⭐⭐⭐ | Portable, good for spot curing, may take longer |
| Sunlight | ⭐⭐ | Free but slow, unpredictable, not recommended for precision work |
| Regular LED/Incandescent Bulbs | ❌ | Will NOT cure UV putty—insufficient UV output |
⚠️ Important: UV putty requires specific UV wavelengths (365-405nm) to cure properly. Standard workshop lighting will not cure this product. For best results, invest in a dedicated UV lamp designed for resin curing or nail gel curing.
❓ Frequently Asked Questions
Will this cure under regular room lighting?
No. UV putty requires UV light specifically in the 365-405nm wavelength range. Regular LED bulbs, incandescent bulbs, and fluorescent tubes do not emit sufficient UV radiation to cure this product. You need a UV lamp, UV flashlight, or strong direct sunlight.
How thick can I apply UV putty in one layer?
For reliable full curing, keep individual layers under 2mm thick. UV light penetrates this depth effectively in 30 seconds. Thicker applications may cure on the surface but remain soft underneath. For deep gaps, build up multiple thin layers, curing each one fully.
What if the putty accidentally hardens in the jar?
The aluminum jar blocks UV light, so this shouldn't happen if you keep the lid closed. If the jar is exposed to strong UV light for extended periods, the surface layer may begin to cure. Always close the jar immediately after use and store away from direct sunlight and UV sources.
Can I use this on all miniature materials?
Yes. UV putty adheres to plastic (styrene, ABS), resin (both polyurethane and epoxy), metal (white metal, pewter, aluminum), wood, and primed surfaces. For best adhesion, ensure surfaces are clean and free of oils or release agents.
Why is the putty semi-transparent?
The translucent nature serves two purposes: (1) It allows you to see exactly where you've applied material, making it easier to identify high spots before sanding. (2) UV light can penetrate deeper for more effective curing. After priming, the transparency is completely hidden.
How long does an opened jar last?
When stored properly (sealed, away from UV light, 7-25°C), an opened jar maintains full effectiveness for approximately 12 months. If the putty thickens over time, you can thin it slightly with a drop or two of isopropyl alcohol and mix thoroughly.
Can I mix pigments or paint into UV putty?
You can add small amounts of pigment, but this may reduce UV light penetration and increase cure time. Dark colors especially can block UV light. For most applications, it's better to use the putty as-is and paint over it after curing. The semi-transparent finish disappears under primer anyway.
How does this compare to regular Green Putty?
Regular Green Putty (acrylic) dries by air/water evaporation in 30-60 minutes and works well for general gap filling. UV Putty cures instantly under UV light, giving you unlimited working time until you're ready to cure. UV is faster for precision work with immediate results; regular is better for when you don't have a UV lamp.
💡 Advanced Techniques & Workshop Tips
🔹 Spot Curing for Complex Shapes
When filling complex curved surfaces, apply putty to the entire area but cure in sections. Hold your UV lamp at an angle to cure one side, then rotate and cure the other side. This prevents shadow areas where UV light can't reach from remaining soft.
🔹 Creating Perfectly Smooth Seams
Apply a small bead of UV putty along the seam. Use a tool dipped in isopropyl alcohol to spread it smoothly across the joint, feathering the edges outward. Before curing, wipe excess with an alcohol-dampened cloth for ultra-smooth results. Then cure and lightly sand if needed.
🔹 Using as a "Test Coat"
The semi-transparent nature makes UV putty perfect for checking smoothness before priming. Apply a thin layer over an area, cure it, and inspect under bright light. Any remaining imperfections show as shadows or texture variations. Sand smooth, repeat if needed.
🔹 Building Custom Details
Use UV putty to sculpt small additions like rivets, battle damage, or weathering effects. Apply a tiny dot, shape it with a dental pick, cure immediately, then add the next one. This technique is much faster than waiting for traditional putty to dry between applications.
🔹 Tool Cleaning
Clean tools immediately with isopropyl alcohol before UV exposure hardens the putty. Keep a small container of alcohol and paper towels at your workspace. If putty accidentally cures on a tool, you can scrape it off or dissolve with acetone (test on tool material first).
🔹 Combining with Other Putties
UV Putty pairs excellently with traditional putties and epoxies. Use epoxy putty for bulk filling or major sculpting, then apply a thin UV putty layer as a final smoothing coat. Sand the UV layer for a glass-smooth finish—much easier than sanding epoxy alone. The instant cure means no waiting between steps.
⚖️ Gap Filler Comparison
📦 Storage & Safety Guidelines
- Always keep jar tightly sealed when not in use to prevent contamination and moisture absorption
- Store away from UV light sources including direct sunlight, UV lamps, and resin printers
- Temperature range: 7-25°C (45-77°F) for optimal shelf life and consistency
- Shelf life: Approximately 12 months when stored properly in sealed container
- Keep out of reach of children—not for consumption
- Use in well-ventilated area though UV putty produces minimal fumes
- Clean spills immediately with isopropyl alcohol before accidental UV exposure causes hardening
- Aluminum jar protection: The specialized packaging blocks UV light—transfer to other containers may reduce shelf life
📦 Package Contents
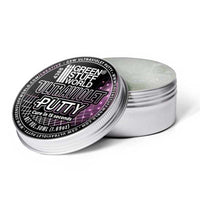
1× Green Stuff World UV Putty (50ml in aluminum jar)
UV-protective packaging • Single-component formula • Ready to use immediately
⚠️ UV lamp required for curing (sold separately)
✅ The Bottom Line
UV Putty transforms how you work with miniatures and models. The instant curing eliminates waiting, while unlimited working time means you can take as long as you need to get every detail perfect. Whether you're prepping miniatures for tabletop gaming, finishing scale models for display, or creating custom conversions, UV Putty delivers professional results in a fraction of the time. Once you experience the freedom of on-demand curing, you'll wonder how you ever worked without it.
50ml goes a long way—perfect size for serious hobbyists who value speed and precision.
Our brands


